
Thermowood
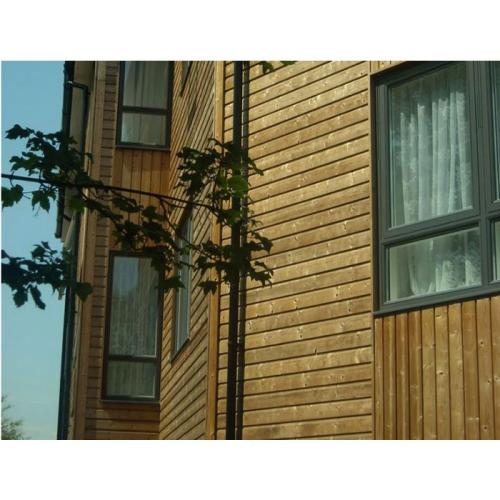
Our range of Thermowood cladding provides a stylish and durable solution for exterior projects. Thermowood is produced through a specialist heat-treatment process, which enhances the timber’s stability, reduces moisture movement, and increases resistance to decay. The result is a sustainable and long-lasting material that performs exceptionally well in outdoor environments.
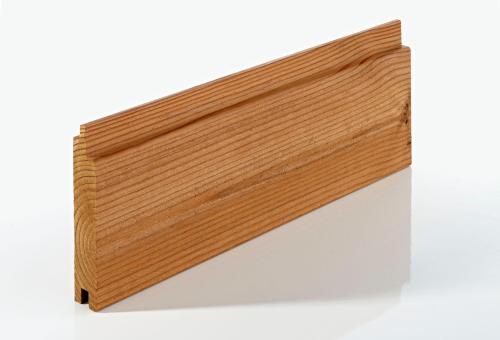
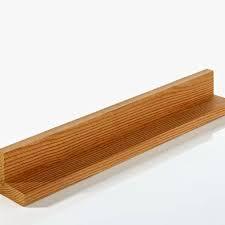
We stock Channel profile Thermowood cladding and PMV profile Thermowood cladding, both offering clean, contemporary lines that are suitable for modern building designs as well as traditional properties. To complete your installation, we also supply L-shape Thermowood corner trims, allowing you to achieve neat, professional-looking corners that enhance the overall appearance of your cladding.
Whether you are renovating a property, designing a garden feature, or building a new extension, Thermowood cladding boards are a low-maintenance and eco-friendly choice. Easy to work with and finish, they can be left to weather naturally to a silver-grey patina or treated to maintain their rich colour.
Choose Thermowood for a high-performance timber cladding solution that combines natural beauty, improved durability, and a professional finish.
How to Install Thermowood Cladding
Guidance for Channel & PMV profiles with matching L-shape corner trims. Always follow project-specific drawings and fixings manufacturer instructions.
Vertical cladding → horizontal battens + vertical counter-battens.
Horizontal cladding → vertical battens.
1) Prepare & Acclimatise
- Install a breathable membrane over sheathing; tape laps per manufacturer guidance.
- Acclimatise cladding on site (off the ground, covered, ventilated) before fixing.
- Plan layout: starter/finishing boards, window/door trims, and L-shape corner trims.
2) Battens & Cavity
- Use treated, straight battens on studs or masonry fixings; keep them plumb/level.
- Provide a continuous 20–25 mm ventilated cavity (use insect mesh at open vents).
- Vertical cladding: fit horizontal battens over membrane, then vertical counter-battens to create the drainage path.
3) Fixing Boards
- Use stainless steel screws (A2/A4). Length ≈ 2.5× board thickness as a guide.
- Pre-drill near ends to avoid splits; keep fixings ~20–50 mm from board ends/edges.
- Face-fix with 2 fixings per batten on boards wider than ~120 mm; for narrower boards, 1 central fixing may be suitable (check profile guidance).
- Stagger end joints on adjacent rows; land all end joints on battens.
4) Expansion, Gaps & Orientation
- Leave expansion gaps between board ends at battens (size depends on board width/moisture; commonly 2–3 mm+). Maintain shadow gaps as designed for Channel/PMV.
- Keep a drip detail at the base and over flashings; maintain ~150 mm clearance from ground.
- Horizontal cladding sheds water naturally; vertical cladding needs careful flashing above openings to avoid water ingress.
5) Corners, Edges & Details
- Fit L-shape corner trims plumb; scribe boards for a tight, neat line into the trim.
- Use starter/termination trims where required; flash and seal around windows/doors.
- Seal end grain (cut ends) before installation for best durability.
6) Finishing & Maintenance
- Thermowood can be left to weather silver-grey or treated with a UV-resistant exterior finish to maintain colour.
- Apply finish to all faces and edges (especially cut ends) as per coating manufacturer guidance.
- Inspect annually: clean, touch-up end grain, and recoat as required by exposure.
Notes: Guidance is general; board thickness/profile, site exposure and local codes may change requirements. Use stainless fixings only. Ensure a continuous ventilated cavity with insect mesh at openings. Always follow the cladding, membrane, fixing and coating manufacturers’ instructions and any Building Control requirements.